What’s New In DonorQuest 7.4
DonorQuest 7.4 includes some major enhancements such as the new Flex Find in the Main Information Window, and the Donor Demographics tab in selections, but it also has a lot of subtle, “nice to have” enhancements, such as the ability to remember your favorite report layouts making them easy to find when you’re in a hurry, and new application-wide vertical and horizontal scroll bars which let you arrange and scroll all DonorQuest content as if it were on a web page. If you are upgrading from a version of DonorQuest earlier than 7.3 (the previous release), you should also consult the various “What’s New…” documents, available on the DonorQuest website. The version of DonorQuest you are currently running is always shown in the upper-left corner of the main DonorQuest window. Here’s an overview of the new features in DonorQuest 7.4:
Flex Find
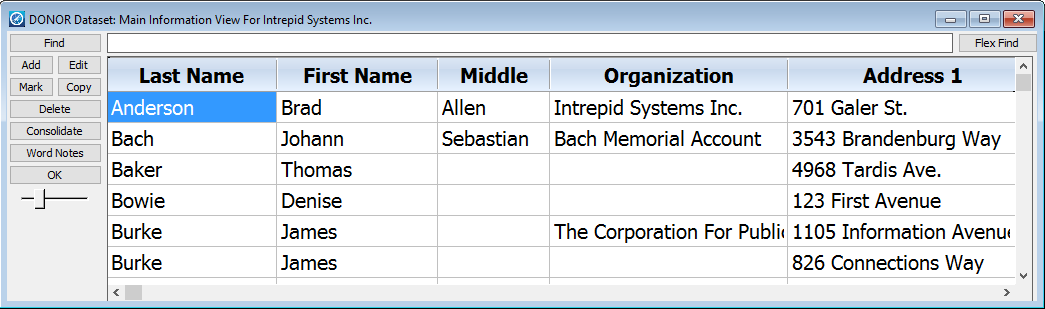
Flex Find is an amazing new way to search for constituent records in the Main Information window. It is a bit like the, “Any Name Field” option of the regular Find, but it simultaneously searches across many fields (not just the name fields), and it is far more flexible in how it does it. You can enter partial names in any order (including partial words of an organization name), and combine bits and pieces of multiple fields in a single search. For example, if you are looking for, “The ABC Foundation For Exceptional Generosity”, with an address of “1234 Main Street”, and a main contact person of, “Elon Musk”, all of the following search keys would work:
ABC 123
Gen Excep
Foun ABC
Elon Foun
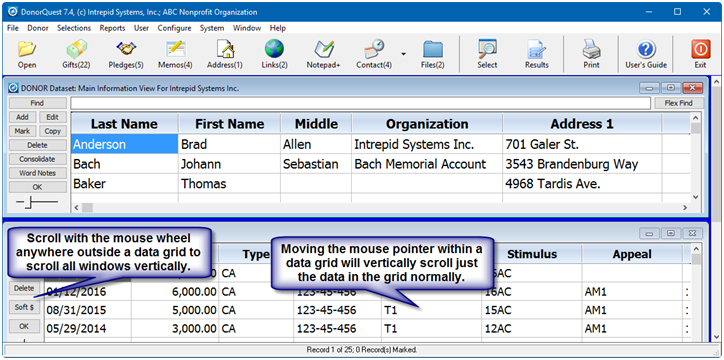
The Flex Find search field is always available at the top of the Main Information window, as shown here:
You may enter a search term in the Flex Find blank and click the Flex Find button to begin a search, or just press the Return key on your keyboard. You may also use the Tab and Shift-Tab key combinations to move between the Flex Find entry blank and the names of the Main Information data grid. To display all constituent names, leave the Flex Find search field blank and press Return.
Hiding Unneeded Columns
All of the data windows in DonorQuest will now remember which columns you wish to see. To turn on or off a column, position the mouse pointer within the title space for the columns on any data grid and do a right-mouse-click. You will see a pop-up menu which allows you to turn on or off display of any column in the window, like this:
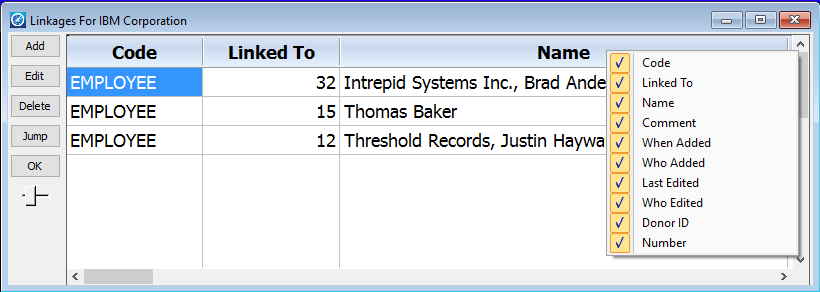
This pop-up menu was present in previous versions of DonorQuest, but the changes were never saved between sessions until now.
Display of User-Defined Fields In Main Info Window
Previously, any user-defined fields you created under the Configure, Setup User-Defined Fields option in DonorQuest could only be viewed on-screen using the Main Information form. Now all user-defined fields also appear in the Main Information data grid. As with all built-in fields, columns with user-defined fields may be moved, resized, or hidden, and DonorQuest will remember your preferences between sessions.
Remembering Your Favorite Reports
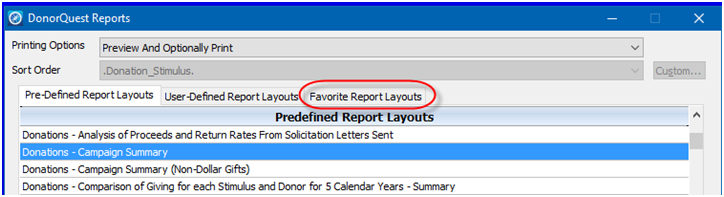
DonorQuest now allows you to maintain a personalized list of the reports you use most often, so that you can get to them quickly. The list is user-specific, so your report preferences will not interfere with those of other users. When the DonorQuest Report menu is open, you will see a new, “Favorite Report Layouts” tab, as shown here:
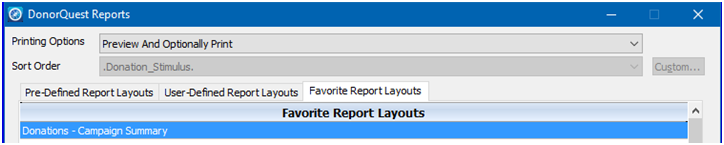
There is also a new, “Add Favorite” button at the bottom of the DonorQuest Reports dialog which will copy the currently highlighted report to your personal Favorite Report Layouts tab:
![]()
For example, clicking on the Add Favorites button when the, “Donations – Campaign Summary” report is highlighted on the Pre-Defined Report Layouts tab will add this report to your personal favorites tab like this:
Scroll Bar Support In Main Application Window
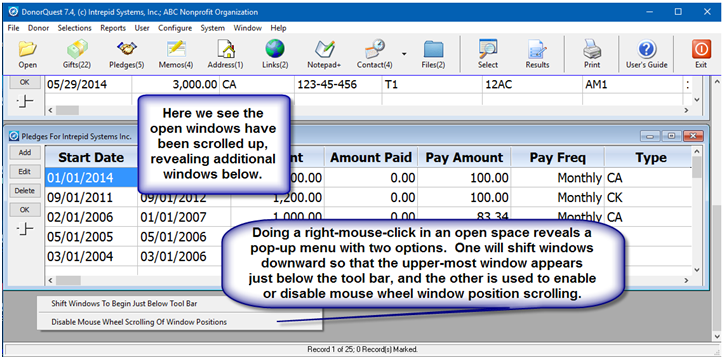
DonorQuest now supports vertical and horizontal scroll bars in the main application window, which allow you to arrange multiple open windows in an area larger than your actual screen space, and quickly scroll or jump to any one of them. Mouse wheel support has also been added for scrolling all windows vertically within the main application window. Here’s how it works:
While the vertical scroll bars may be used in a traditional fashion to move all windows, the mouse wheel scrolling action is context-sensitive. When the mouse pointer is inside the scrollable data grid area of a specific window, only that data grid is scrolled. However, if the mouse pointer is outside of the scrollable area of a specific window, all windows are moved up or down.
Tile Vertically Maintaining Window Heights
Clicking on the Window menu and choosing Tile Vertically Maintaining Window Heights will arrange all open windows vertically without changing their heights. They will extend into an “infinite” vertical space, accessed by scrolling, or clicking the corresponding tool bar icons to immediately jump to a specific window.
Tile Vertically Maintaining Horizontal Positions
Clicking on the Window menu and choosing Tile Vertically Maintaining Horizontal Positions is very similar to the above tiling option, but any custom horizontal placement of your windows will remain intact. So for example, if you have the Donations and Pledges windows positioned side-by-side, they will remain side-by-side, but will both be moved up or down to fill in any gaps which may exist between the windows above and below them.
Replicate Condition Button On General Conditions Tab
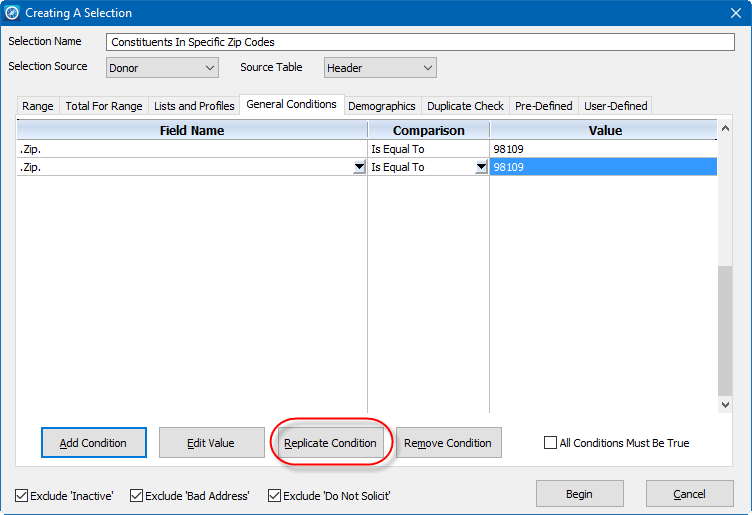
The General Conditions tab of the Creating A Selection dialog now has a new Replicate Condition button. This is useful when you have a lot of different values you wish to search for in the same field. For example, if you wish to find all of the constituents in a number of specific zip codes, you only have to choose the Zip field and Is Equal To comparison once, then use the Replicate Condition button to make lots of copies of what would be the same choices were you to use the drop-down menus repeatedly while adding a new condition. You have only then to double-click in the Value space to enter each specific zip codes you wish to select constituents for.
You may now also order the conditions of the General Conditions tab by clicking on the title of the Field Name, Comparison, or Value columns. When you have a long list of conditions, it is often helpful to order the list by Value, so you can quickly see if you have left out anything you need (such as a specific zip code in a long list of zip codes). Here’s what the new dialog looks like:
Optional Database Encryption
DonorQuest is now capable of encrypting your entire database while still providing full multi-user access. This feature is intended mainly for those still using DonorQuest in-house on a local file server. The encryption is seamless, so that everything in DonorQuest works just as you would expect for all features. This adds a layer of protection for your sensitive donor data, making your data appear as unreadable gibberish to any would-be thieves which either hack into your main file server over the Internet, or perhaps even physically steal it from your office. Without knowing a DonorQuest User Name and Password, there is absolutely no way a hacker could decrypt your data if you are running DonorQuest with encryption on. To enable or disable encryption, from within DonorQuest click on Configure, Program Settings. You will find a checkbox there to encrypt your database. You may also uncheck the box to return to running in normal unencrypted mode. The only downside of running with encryption on is that it will slow DonorQuest performance slightly, but only by about 10% on average. The new performance enhancements in selections will typically more than make up for it.
Selection Performance Enhanced
The DonorQuest selection process now uses high speed index files for certain key fields. If your selection references one of the key fields, DonorQuest will automatically optimize the selection so that only the records matching the condition you use for the key field will be processed. Previously, DonorQuest would need to sequentially process each record in the source table for each selection.
New Demographics Tab In Selections
The new Demographics selection tab in DonorQuest allows you to find constituents based on demographic information publically available for the zip code in which the constituent lives. You can select constituents based on Zip Code Radius, Ethnicity, Age, Education Level, Median Household Income, Median Per Person Income, Average Home Value, etc. Since the demographic information is zip code based and statistical in nature, it does not violate a constituent’s privacy.
Here is an example of using the Demographics tab to find all of the constituents who live between ten and twenty miles from the center zip code of 98109:
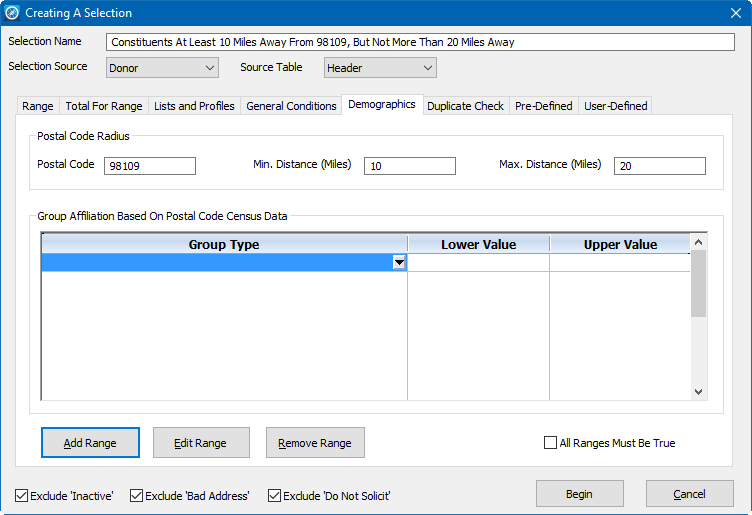
You can think of the above selection as finding constituents in your database who live within a “ring” around a center zip code, with the inner circumference of the ring being 10 miles outside the center zip code, and the outer circumference of the ring being 20 miles outside the center zip code. This may of course be combined with any of the other selection tabs to ask questions such as, “Who has given $500 or more in the past six months, and lives within 15 miles of our main office?”
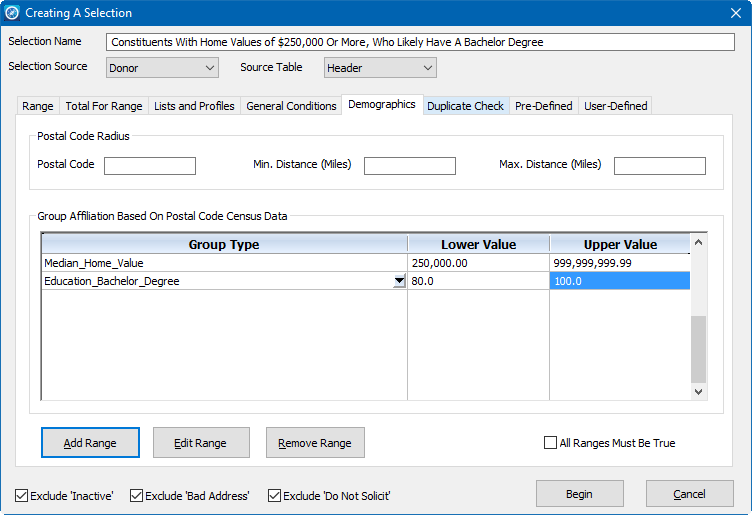
The Group Affiliation demographic conditions are expressed as ranges. The ranges will either be dollar amounts (for home values, median incomes, etc.) or percentages. When they are percentages, the percentage refers to the percentage of people within the constituent’s zip code who have a particular attribute. Following is an example of how to select all the constituents with home values of $250,000 or more, who live in a zip code for which 80% of the people have Bachelor Degrees:
Note that this is not a guarantee that the selected constituents have Bachelor Degrees, but there’s an 80% chance they do based on the zip code they live in. Likewise, there is no guarantee the value of their home is $250,000 or more, but it is likely given the median home value for the zip code in which they live.
New Standard Reports Added
DonorQuest 7.4 includes the following new standard reports:
Donations – Grouped By 5-Digit Zip Code
Donations – Grouped By 5-Digit Zip Code – Summary
Donations – Grouped By Year With Donor Name, Amount, Stimulus
Header – Constituent Name With Stored File List And Count
Header – Donor Name And Street Address With Most Recent Donation Stimulus
Header – Top 1000 Donor Report
Header – Top 5000 Donor Report